How to Export Data Collected from Tag Inspector Scans and RealTime

Tag Inspector Exports How-To Guide
Estimated Reading Time: 3 minutes

You asked, we listened.

The Tag Inspector team has made it easier than ever to export data collected from scans and Realtime. After data has been collected, your organization now has the option to download a .csv file directly from the Tag Inspector website.

Visiting the Exports Page

In Tag Inspector, click the export icon (📥) in the top toolbar (or visit https://taginspector.com/exports) to display your organization’s export page. This page will display your previous and queued exports for your organization to explore.

Tag Inspector Exports feature

Once an export is submitted, the request will take some time to process. During that time, the new export will display in the table in a “Queued” status.

Tag Inspector exports feature

When the export is complete, the status will change to “Complete” and a download link will appear. Click the link to download the export in .csv format.

Tag Inspector Exports feature

You can create an export for both Scanner and Realtime. First, click “New Export” or “Create a New Export” button. An export wizard form will display.

Scanner Export: Step-By-Step

1. Choose “Scanner” as the type of data to export.

Tag inspector exports feature

2. Select the scan from the table of available items. You can search or page through the options to find the scan.

Tag Inspector scanner export feature

3. Select the type of export you need. Each export type will come with a different set of data that can be exported.

Tag inspector exports feature

4. Now, choose the fields you want to view within the report. This list of export fields is dynamically loaded based on the type of export report you chose from the previous step. (Tip: Don’t see the field you need? Click “Back” and try a different export report type.)

Tag Inspector scanner exports feature

5. Click Submit to start your export! You’ll see it queued in the exports main page.

Tag Inspector exports submit

Realtime Export: Step-By-Step

1. Choose “Realtime” as the type of data to export.

Tag Inspector Exports feature realtime

2. Select the site from the table of available items. You can search or page through the available options to find the site.

Tag Inspector Exports feature realtime

3. Select Realtime as the type of report.

Tag Inspector Realtime Export

4. Now, choose the fields you want to view within the report. This list of export fields is dynamically loaded based on the type of export report you chose from the previous step. (Tip: Don’t see the field you need? Click “Back” and try a different export report type.)

Tag Inspector Exports realtime functionality

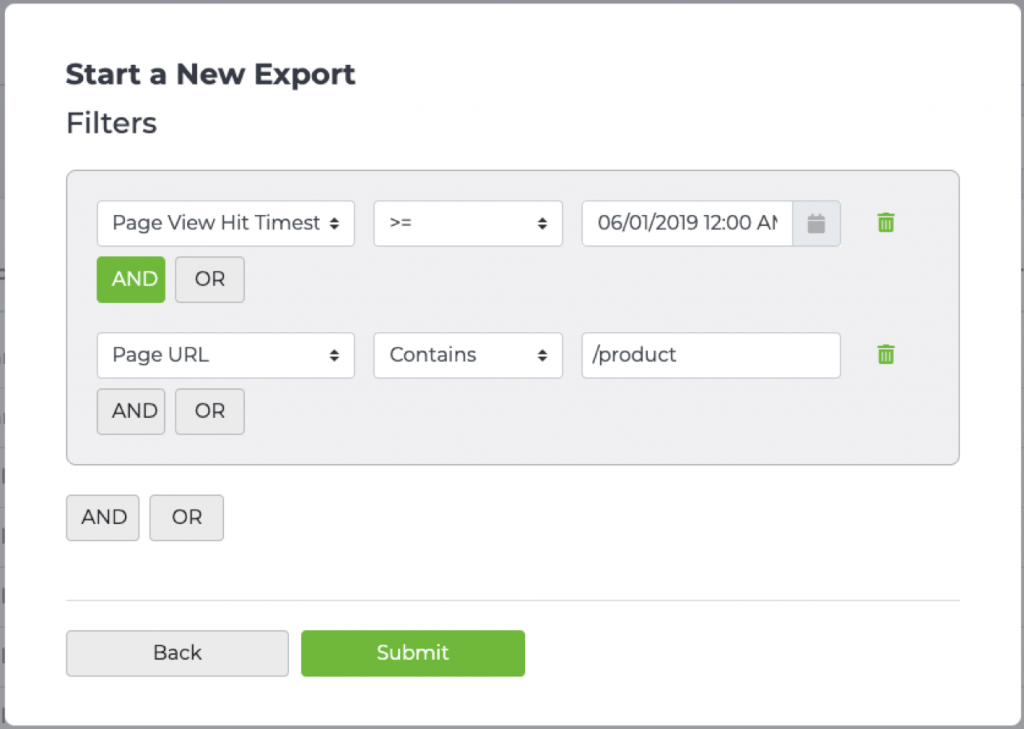
5. Since Realtime data can collect a large amount of data across many users, we have added a filter option. This uses and/or logic to build filters to target the data you need. (Tip: Try setting filters for Page View Timestamp to limit the data to a date range, or Page URLs to target specific training. In this example, we are looking for data with Page View Timestamps starting June 1, 2019 on sites containing products in the URL.)

tag inspector realtime data export

6. Click Submit to start your export. You’ll see it queued in the exports main page.

Tag Inspector exports submit

Questions about Exports?

If you’re interested in learning more about Tag Inspector’s new exports functionality, or would like to better understand potential use cases for this feature, reach out to our team today. 

Contact Us about Exports

Click the button below to contact our team with questions about exports and additional Tag Inspector functionalities.
Originally Published On June 24, 2019
October 8, 2020