Alright, you’ve done a ton of work cleaning up all of the tagging on the hundreds of websites that are in your organization’s portfolio. You’ve configured all of your third-party tags to fire through a Tag Management System (TMS) such as Adobe Launch or Google Tag Manager. And you’ve configured all of the settings in your Consent Management Platform (CMP) such as OneTrust or Trust Arc to correctly categorize all of your tags as Strictly Necessary, Functional, Targeting, or Performance.
But now the next million-dollar question: After having expended all of this effort meticulously getting your site portfolio to a good state, how do you ensure it stays in a good state moving forward?
If you are a large organization, you likely have a plethora of third-party agencies managing your organization’s various sites. How do you ensure a contractor or developer somewhere halfway around the world doesn’t accidentally deploy a tag accidentally on your production site that inadvertently violates user consent preferences that gets your organization sued?
Tag Inspector governance policies to the rescue!
In a previous article, we discussed how you can leverage the Governance Tag Summary view to see the tagging landscape of your site’s portfolio through different consent lenses. In this article today, though, we’ll dive deeper into the Policies feature of the Tag Inspector Governance module to explain in greater detail how it works and how it can help you ride herd over the legions of tags on your organization’s many sites.
To begin, let’s consider this example use case where we have configured two sites (infotrust.com and taginspector.com) across three regions (California, Virginia, and the EU):

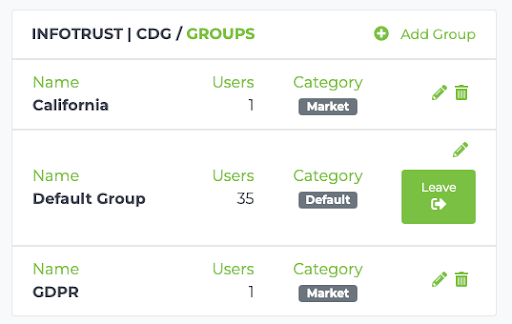
After having configured these sites, you can then create arbitrarily-defined groupings for your sites. These groupings can be defined any way you please! Some organizations choose to group their sites by a particular geography (this is popular). Other organizations choose to group their sites aligned with their internal organizational structure (eg. the Direct-to-Consumer (DTC) division vs the Business-to-Business (B2B) division). Because Tag Inspector serves a large constituency of clients, we have built the tool to accommodate most organizations needs and use-cases.
For this example, we will go ahead and define two groups, which in turn also creates two policies:
- California Group -> California Policy
- GDPR Group -> GDPR Policy
Each grouping of sites also corresponds 1:1 with a policy:
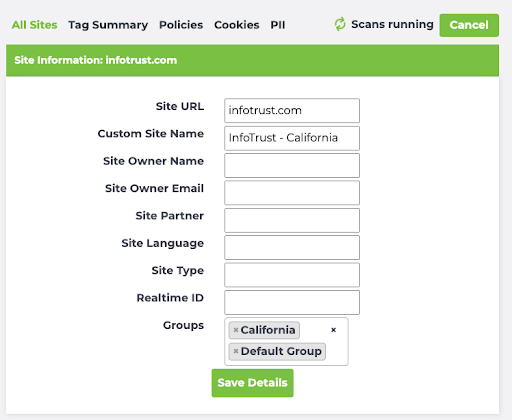
And now you can then associate a site with a group:
In Tag Inspector, sites-to-groups is a one-to-many relationship. Each site can belong to multiple groups. (For instance, a common pattern in Tag Inspector is to have every Governance site always belong to the Default Group, in addition to whatever other specific groups you may assign.):
And now we’re off to the races! Once you have finished associating all of your TI Governance sites to groups, you can navigate to the Governance Policies tab:
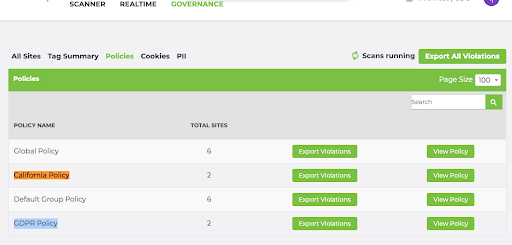
And you’ll see that the California Policy contains two sites (infotrust.com and taginspector.com; each scanned from the California region) as well as the GDPR Policy (infotrust.com and taginspector.com; each scanned from France, a GDPR country.)
Once you view California’s Policy, you can then approve specific tags you wish to allow to load on the site per different consent conditions. Additionally, you may also specify how the tag is approved to load. For example, here, we have configured the Facebook Pixel to be allowed to load when the user has accepted all cookies as their consent preference, but only if it’s piggybacked through the Google Tag Manager tag. Likewise, we have approved OneTrust to load, but only if it loads directly from source.
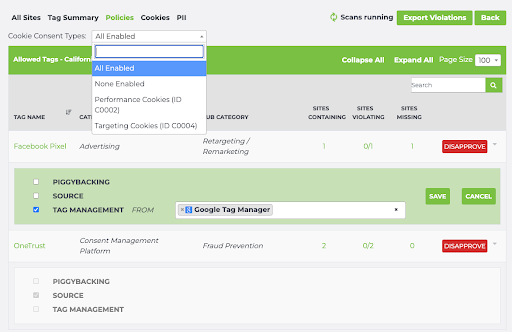
For that same California group, we can define its None Enabled policy (when the user has smashed that “Reject all cookies” button!) to look something like this:
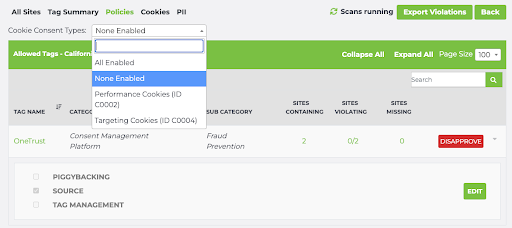
Here, we have specified OneTrust to be the only tag that is allowed to load if a user has declined consent.
Tag Inspector Governance scans automatically run once each month for every single consent condition that your site is configured for. So the usual workflow of Tag Inspector is to review this Governance policy page monthly, after the month’s scan has run. Then you’ll be able to easily review the Governance policy and see if there are any violations or any tags that are incorrectly being fired when users visit under the Not Allowed Tags section of the Policy.
For example, in this same California group, if we scroll down for the None Enabled policy, we see in the Sites Containing column that one site fires Bugsnag, two sites fire DoubleClick, and one site fires Facebook Pixel.
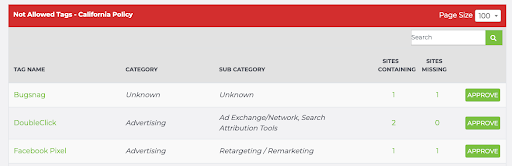
And clicking on the number in that column will then display the specific sites causing the violation. For example, clicking on the “2” for the DoubleClick tag shows:
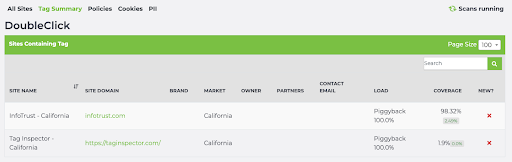
Here we see that Double Click is erroneously firing on infotrust.com and taginspector.com when the user has declined consent.
Tag Inspector Governance Policies provide an excellent way to ensure reliable and consistent governance of the plethora of tags on your organization’s legion of sites. If you are interested to discuss further or see a demo, please contact us. We would love to show you Tag Inspector in action!
